PR
I’m a born-and-raised Japanese. English is a complete mystery to me—and honestly, my Japanese is just mystery with a little extra fuzz.
This post was translated by AI. Read at your own risk!
- Bent Kluson Peg Shaft:A Reckless Attempt at Repair
- Introduction
- Tools & Setup for the Peg Shaft Repair
- Tools Used
- Step 1:Diagnosis & Damage Assessment
- Step 2:Remove the Peg from the Guitar
- Step 3:Build the Jig
- Step 4:Setting Up for the Bend Correction
- Step 5:Wrapping with Masking Tape
- Step 6:Attaching the Peg Winder
- Step 7:Fixing the Peg in a Vise
- Step 8:Main Repair – Straightening the Shaft
- Results
- Step 9:Function Check
- Final Thoughts
- S©ALETONE. musings
Bent Kluson Peg Shaft:A Reckless Attempt at Repair
This article documents a personal, amateur attempt to fix a bent Kluson-style peg shaft.
The method is forceful, risky, and not recommended.
Please enjoy this as a story—not a tutorial.
If you choose to try anything described here, do so entirely at your own risk.
We take no responsibility for any damage or heartbreak that may occur.
That Familiar “Squish”
If you love guitars, you’ve probably felt it at least once:
That soft, wobbly twist of a bent peg shaft.
It’s not quite majestic—it’s more like a tiny dose of despair.
This post is a record of my reckless attempt to straighten a Kluson-style shaft.
The method is brute-force and entirely self-invented.
I strongly advise against using it as a guide.
Instead, I hope you enjoy it as a curious tale of DIY misadventure.
Before You Read Further
- Bent shafts rarely return to perfect alignment.
- Even if they do, the gear housing may warp and require further repair.
- Peg buttons may crack—especially shrink-type buttons, which will almost certainly shatter.
- If your goal is reliable function, just replace the peg.
Kluson-style pegs are widely available and reasonably priced.
If you’re chasing both vintage accuracy and functionality,
consider buying used or salvaging parts from junk pegs.
Still tempted?
Then maybe you’re like me—someone who values aesthetics, curiosity, or the joy of tinkering.
This post might be for you.
Why I Tried Anyway
Because sometimes, the repair itself is the reward.
This is my record of a reckless but heartfelt attempt.
Introduction
This is a record born from a beginner’s challenge—complete with step-by-step photos and the real concerns I felt along the way.
The tension between the courage to break and the desire to fix.
What emerged was a sense of fulfillment, disguised as repair.
- “Whether you’re ready to break something or hoping not to—don’t just use this as a reference. Enjoy the read.”
- “I’ve included the kind of pitfalls you only notice once you actually try.”
- “Alongside real process photos, I’ve shared intuitive tips that helped me through.”
Tools & Setup for the Peg Shaft Repair
This is a personal, forceful, and risky method.
Please enjoy it as a story—not a guide.
If you choose to try anything here, do so entirely at your own risk.
Tools Used
Here’s a list of tools I used for this repair.
Some are optional, some are improvised, and all were chosen with one goal:
Minimize damage while maximizing control.
Rectangular wood block
Used to create a jig for securing the peg.
It doesn’t have to be a perfect cube or trapezoid—just make sure it has at least one pair of parallel surfaces.
Size-wise, think of something like a cigarette pack or a small smartphone box.
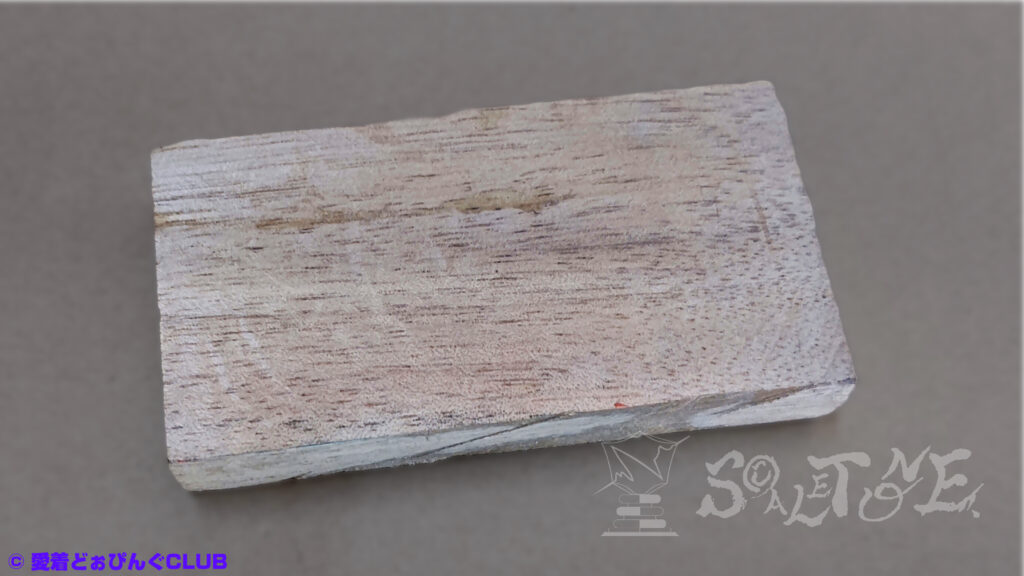
A cigarette pack-sized block is the minimum. (What’s the 2025 equivalent of “cigarette pack”?)
Screwdriver
For removing and reinstalling the peg.
Amazonでの検索結果:“ドライバーセット“
Drill
Manual or electric—either works.
Amazonでの検索結果:“ドリルドライバー“
Drill Bit [Around Φ8.0–10.0 mm]
Diameter: approx. 8.0–10.0 mm
Used to create a hole for the peg post.

Amazonでの検索結果:“六角軸ショートドリル 8.0mm“
Pilot hole bit [Φ1.5 mm)]— optional
Diameter: approx. 1.5 mm
Used for pilot holes when securing the peg with screws.
Amazonでの検索結果:“マイクロドリル“
Wood Screws [M2.4 or similar]
Used to fix the peg to the wood block.
If you’re using the original screws, these may not be necessary.
But since force will be applied, it’s better to use screws you don’t mind sacrificing.
Vise or Clamp
To hold the peg securely during the bending process.
Amazonで購入する:“ボール盤バイス“
Protective Materials
- Masking tape
- Rubber mat or soft cloth
Used to prevent scratches and distribute pressure.
Amazonで購入する:“マスキングテープ“
Peg Winder
Used creatively—not for winding strings, but for applying controlled force to the peg button.
Amazonでの検索結果:“ペグワインダー“
Step 1:Diagnosis & Damage Assessment
Before doing anything, take time to observe.
This step is about sensing the bend, the wobble, and the overall health of the peg.
Goals
- Check the angle and direction of the bend
- Feel for looseness or misalignment
- Examine the gear box for distortion
- Compare with string tension on vs. off
This is where you decide:
Can you live with the imperfection?
Will you fix it, replace it, or leave it alone?
Tips
- Rotate the peg shaft and memorize any strange resistance
- Gently wiggle the shaft—up/down, left/right
- Use your phone’s camera gridlines for alignment
- Take photos for reference
Sensory Insight
This repair relies on your own perception.
If you don’t feel anything unusual, it might not be serious enough to worry about.
Choosing to walk away can be a wise decision—one that saves you from regret.
But if you do sense something off,
I’ll share a trick later to help you feel it more clearly.
Step 2:Remove the Peg from the Guitar
To work safely and precisely, remove the peg from the guitar.
This reduces stress on the instrument and lets you handle the peg on its own.
Goals
- Remove the peg without damaging the guitar
- Handle screws carefully and store them in a lidded container
- Prevent damage to the peg button
Tips
- Carefully remove screws without scratching the headstock
- Use a screwdriver slowly and deliberately
- Be careful not to slip or damage the headstock surface
- Check the peg button for cracks or stress marks
- Watch for paint adhesion or wood compression around the baseplate
- Forcing the peg out may worsen damage—paint adhesion or embedded wood can tear further if stressed
Even if the peg looks fine, a bent shaft may mean hidden damage to the button.
Treat every part as fragile—even if it appears unharmed.
Step 3:Build the Jig
Before applying any force, build a jig—a custom support block to hold the peg securely and reduce stress on the gear housing.
Goals
- Create a hole that fits the peg post snugly
- Ensure the peg sits straight and stable
- Minimize pressure on fragile parts
Process
Step 1:Drill a hole
Drill a hole into the wood block, slightly wider than the peg post
For this attempt: Φ8.0 mm diameter, 40–50 mm deep
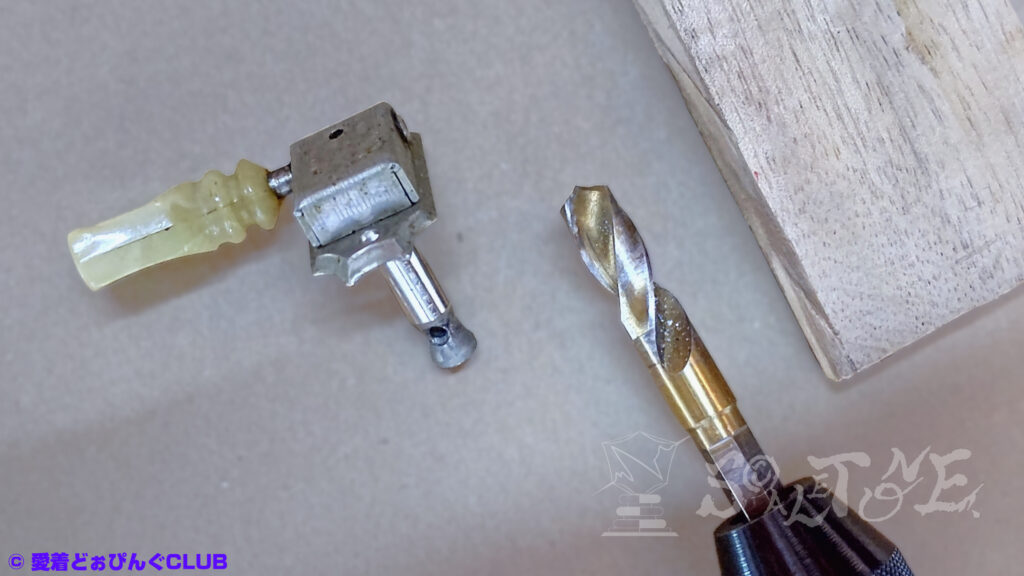
For Rotomatics: likely Φ10 mm, but I’d personally disassemble instead
If mixing vintage and modern styles, Φ10 mm may still apply
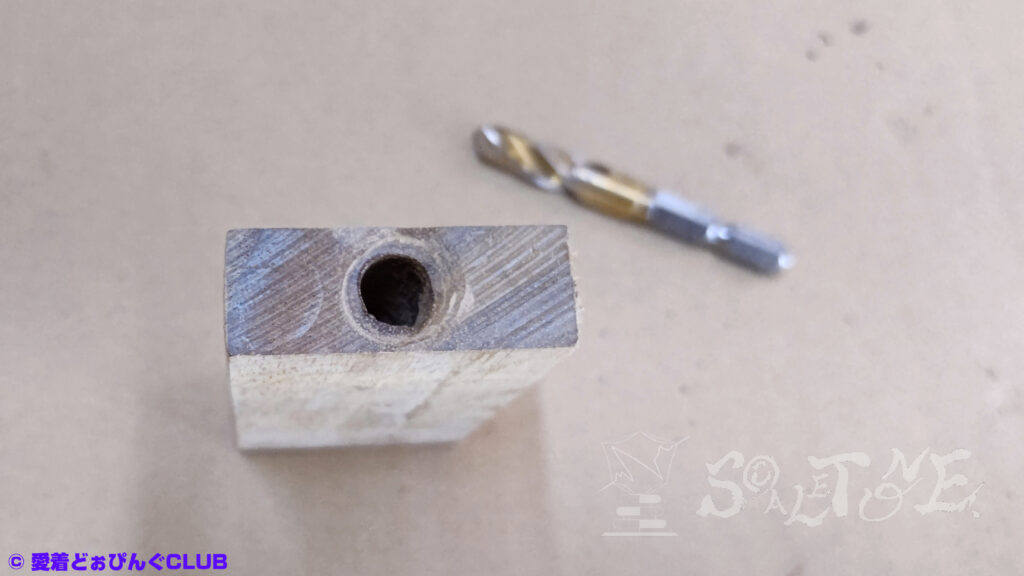
Step 2:pilot holes
Consider drilling pilot holes for screws to prevent splitting
Fix the peg into the block using wood screws or equivalent
Notes
- Wood can split under pressure, and screws may snap from friction
- If unsure, pre-drill pilot holes to reduce stress
- This jig is meant to absorb force—not transfer it to the gear housing
Step 4:Setting Up for the Bend Correction
Now that the jig is ready, it’s time to mount the peg and prepare for the actual correction.
Fixing the Peg into the Jig
Mount the Peg in the Wood Block
- Insert the peg post into the drilled hole
- Secure it with screws if needed
- I skipped the pilot hole this time and went straight in.
Re-check the angle and deformation
Observation:
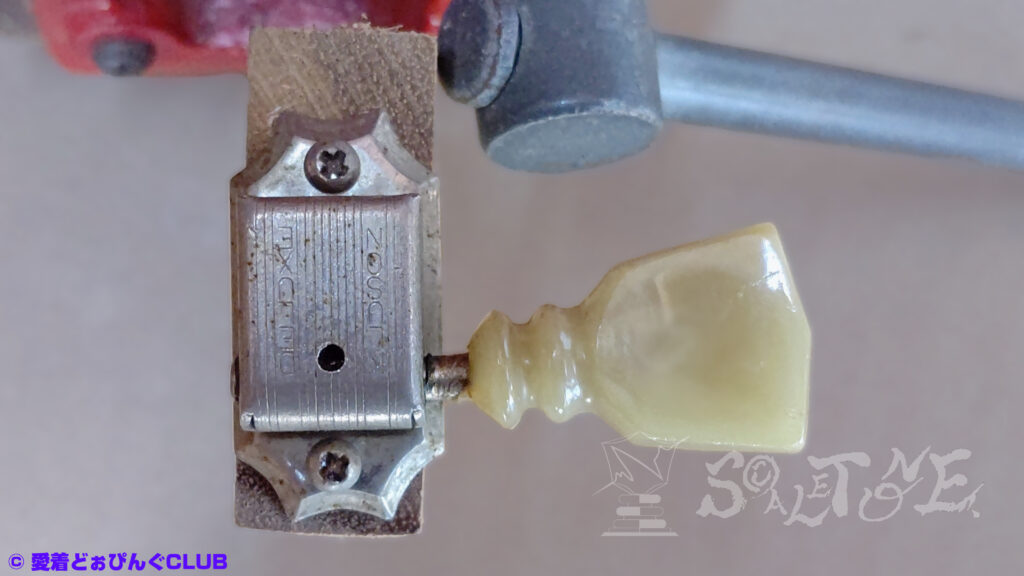
The deformation was checked against the white line.
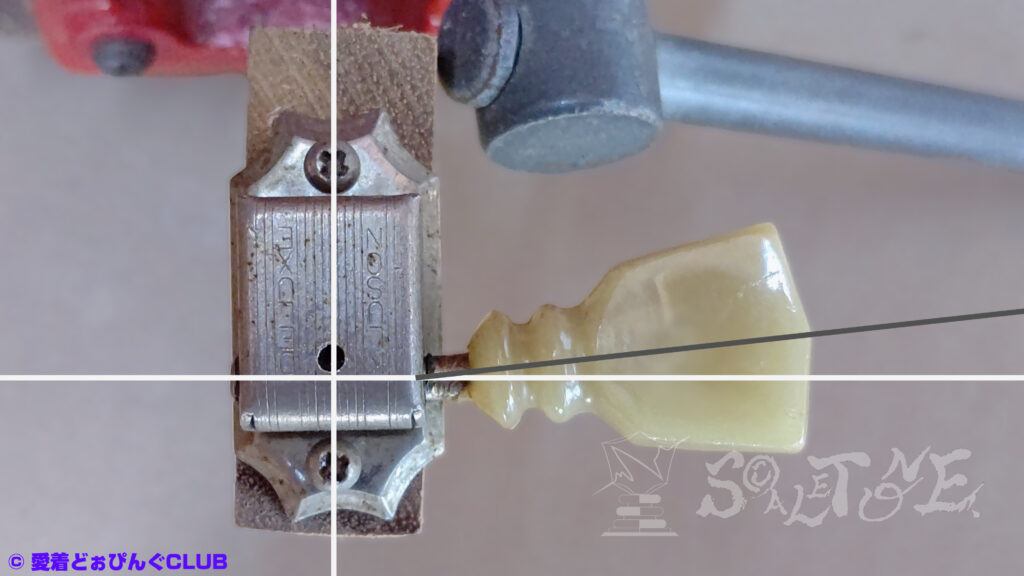
The peg had double-ring “KLUSON DELUXE” two-line engraving—short shaft, 1960s spec.
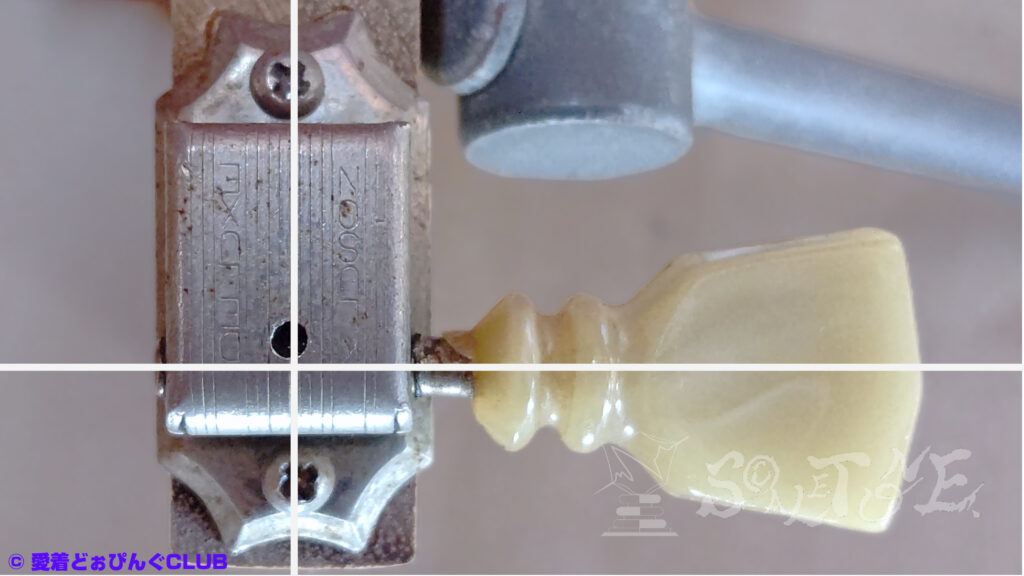
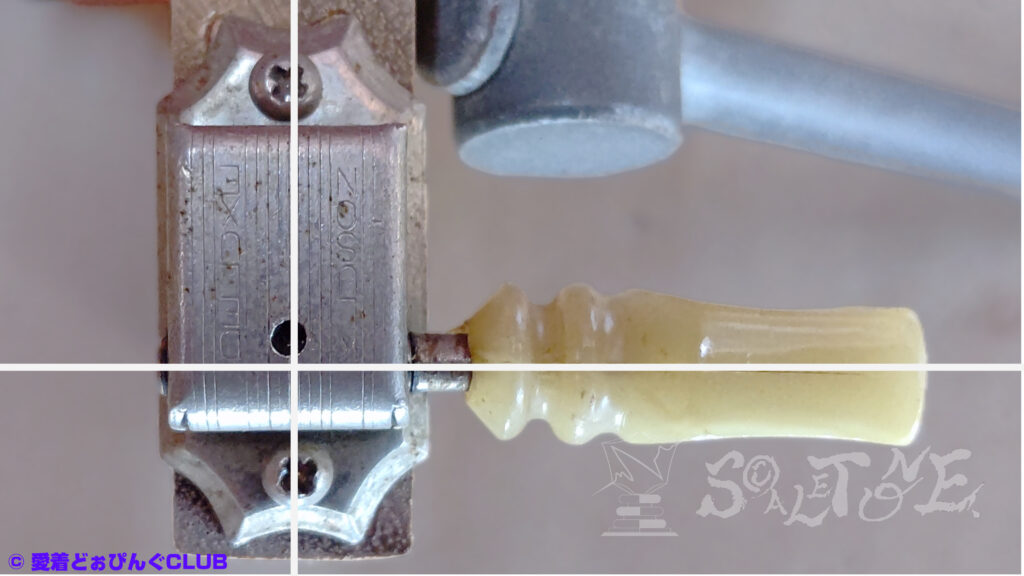
Step 5:Wrapping with Masking Tape
Purpose
- Protect the peg button from direct pressure
- Fill the gap between the button and the winder for better grip

Tips
- Wrap just enough tape so the winder slides on with a soft “thud”—not too loose, not too tight
Step 6:Attaching the Peg Winder
- Fit the winder onto the peg button
- Adjust the fit using tape
- Disposable tools are ideal—this process may damage them
Masking Tape & Peg Winder Prep
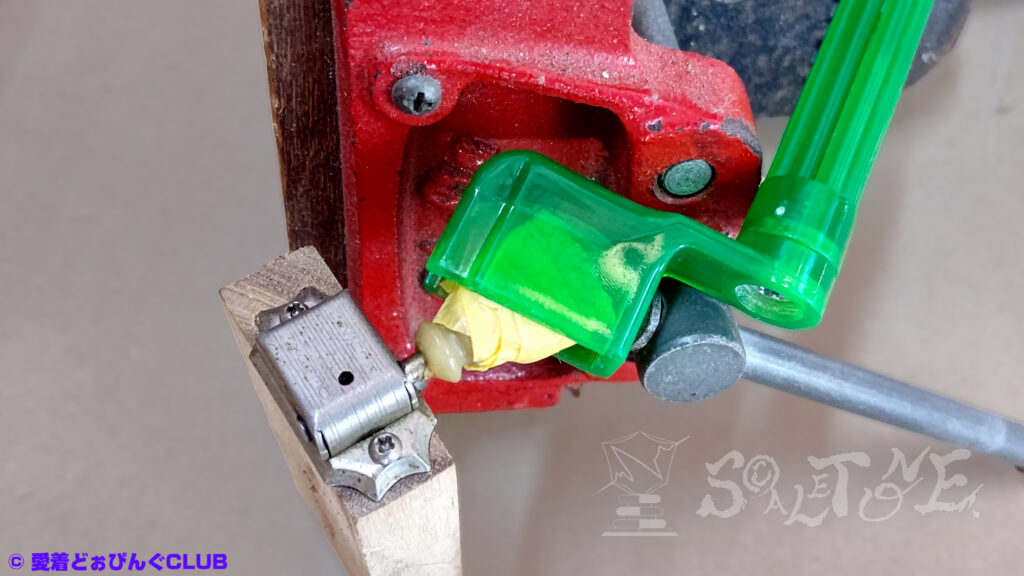
Purpose
- Protect the peg button
- Fill the gap between winder and button
Tips
- Wrap enough tape so the winder “slips softly” when turned
- I used a cheap winder from a local shop—easy to sacrifice if needed
- It’s important that the winder fits loosely and is disposable—this process may destroy it
Step 7:Fixing the Peg in a Vise
Securing with a Vise (Optional)
Note:
No photo available, so I’ve used an illustration to explain.
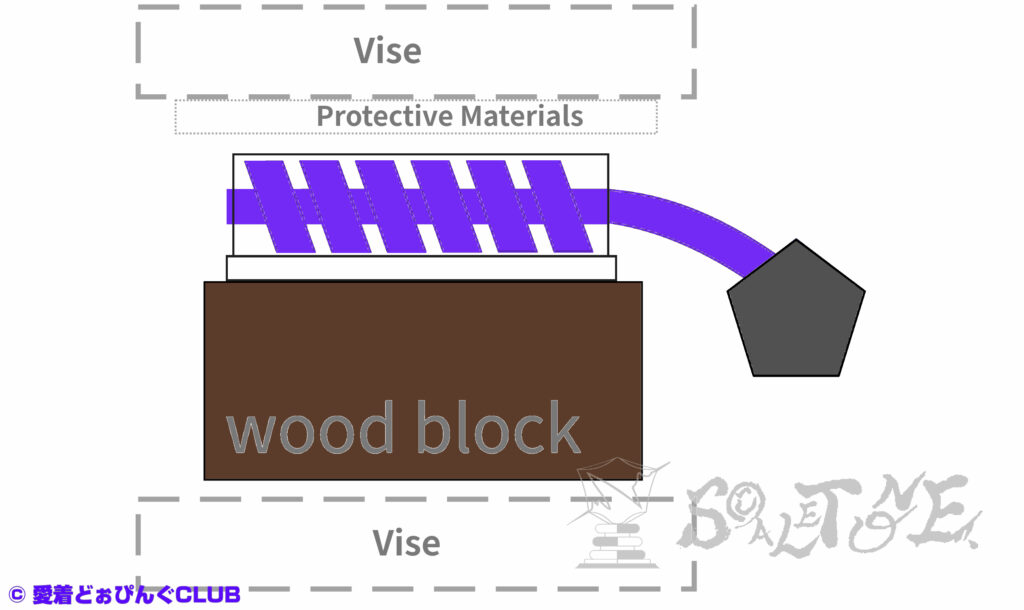
Tips:
- Use cloth or rubber padding to prevent scratches
- Fix the jig into a vise to stabilize the setup
- This helps distribute force and reduce twisting stress
- Even without a vise, you can proceed—but stability makes a big difference
Step 8:Main Repair – Straightening the Shaft
Main Repair – Straightening the Shaft
Key Insight:
The direction and amount of force are everything.
Too much force, or force in the wrong direction, can lead to:
- Shaft breakage
- Gearbox distortion
- Post snapping
- Warped worm gear
The Most Important Trick
Here’s the “secret technique” I mentioned earlier.
Hold the peg winder by its tip—not the handle.
Rotate it slowly, about one full turn every 3 seconds.
Because your fingers are farther from the rotation center,
you’ll feel resistance and wobble more clearly.
When you sense a change, mark the direction and angle of the bend.
Repeat from different angles to improve accuracy.
No Pliers Allowed
I didn’t use pliers or grips.
They’re slippery, imprecise, and risk crushing the peg button.
Instead, I kept the winder attached and applied upward force gently.
Why?
- It allows directional control
- It distributes pressure across the peg button
How to Apply Force
Imagine the shaft and winder as one long stick.
Use all fingers except your thumb to support and guide it.
Your thumb becomes the pivot point.
Think of it like using a bottle opener.
(Though… do people still use those in 2025?)
Lift from the pinky side, using leverage.
Visual Concept
I used the red circle as a pivot,
pressing the shaft against the baseplate (oval)
while lifting the peg button.

Caution
Force is likely applied only where the cover supports the shaft
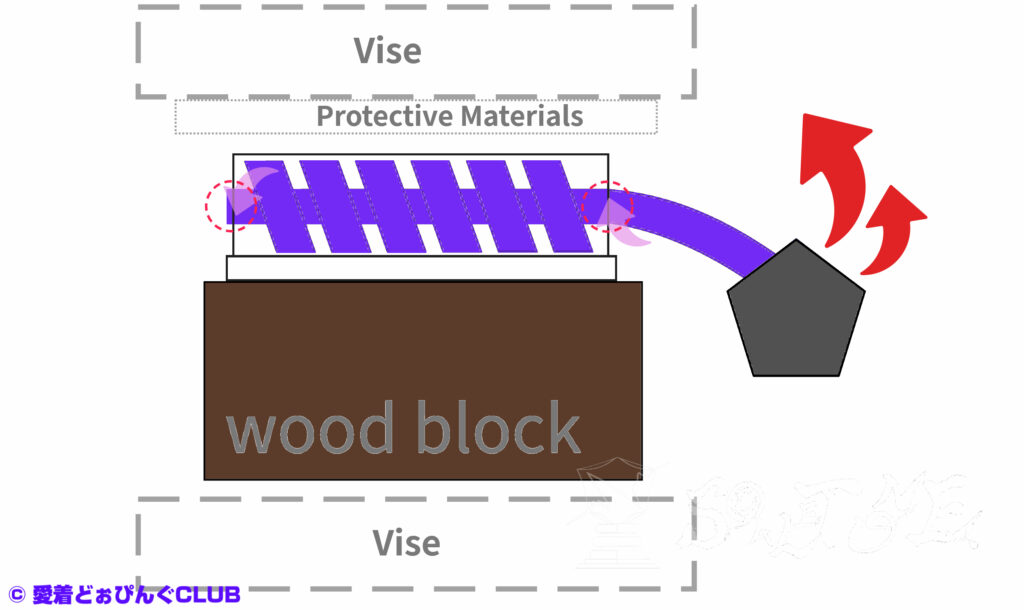
Avoid expanding the cover hole unevenly.
Mechanical Notes
Kluson pegs use a worm gear mounted vertically to the post.
Any deformation or damage to the gear, teeth, screws, or post
can ruin the peg entirely.
Avoid applying force parallel to the baseplate
or in a direction that pulls the button away from the post.
Force Technique
Apply gentle, incremental pressure.
Don’t force it in one go.
Rotate slowly, feel for the right moment,
then apply a quick, subtle “tug”—like a fish nibbling bait.
Repeat until the shaft is reasonably straight.
If you hear a “snap” or feel a “grind,” stop immediately.
That’s the danger zone.
Results
Gray line shows the bend against the white reference line.
Befofe
After
Photos taken at 90° intervals.
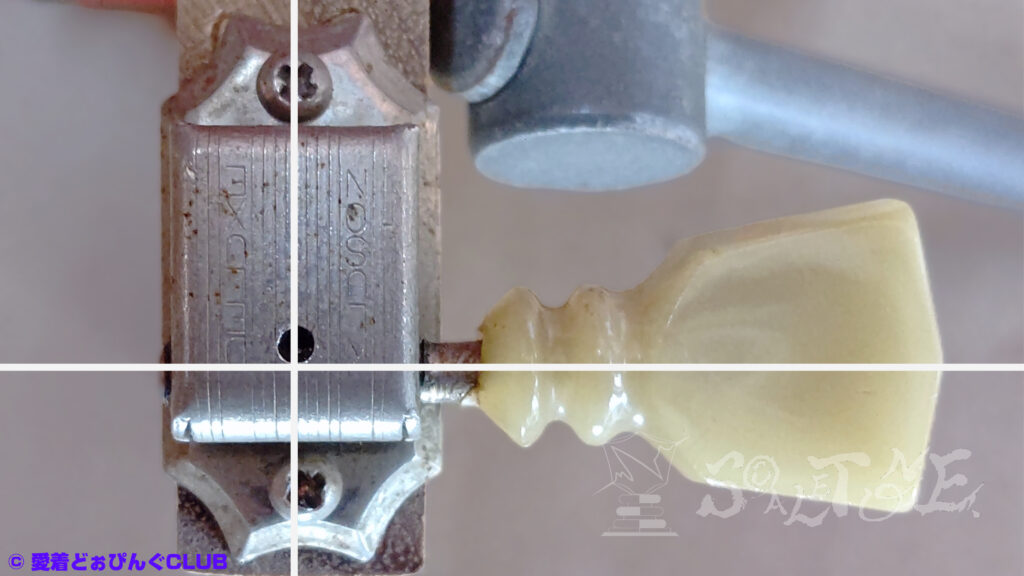
Look for the burr at the peg button and shaft junction.
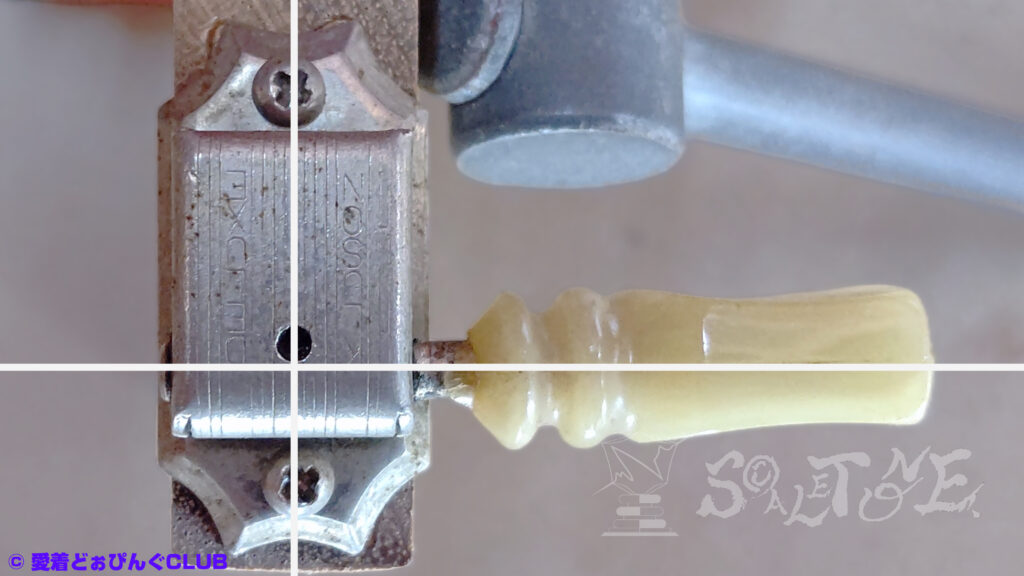
It’s not perfect, but it’s functional.
And that’s enough.
Step 9:Function Check
Reinstall the peg and test its performance.
(Note: I used a different peg for reinstallation, so no photo here.)
To reinstall the original screw, gently rotate the screwdriver counterclockwise while keeping the screw aligned with the hole. You’ll notice a slight drop—this marks the starting point for tightening.
Checkpoints:
- Button movement
- Gear engagement
- Shaft rotation
- Tuning accuracy
If it rotates smoothly and holds position, it’s a success.
Final Thoughts
Thanks for sticking with me to the end.
Repair isn’t just restoration—it’s a challenge to possibility.
Sometimes, the willingness to break something
is what helps us protect what matters most.
Looking back, this was just about bending a thin metal rod.
But if it helped you in any way, I’m glad.
You can return to the tool list.
Maybe I just got lucky this time.
Personally, I think storing the peg is the wiser choice.
If you’re interested, some modern third-party pegs
still use brass posts—worth checking out.
S©ALETONE. musings
From a toilet paper’s point of view, machine heads are impressively tough—they hold up without even a stopper.
This has been a story of dreams, illusions, and constructed fiction shared with the reader.
Its practical value and factual accuracy are not guaranteed.
This text is based on AI-generated translation. The author is a native Japanese speaker with limited proficiency in both English and Japanese.
Please proceed at your own discretion.
AI wrote this. I just watched.
Original Content – Japanese Version

Disclaimer
This guide describes one careful attempt to fix a bent vintage tuning peg without replacement.
It is not a recommendation, and results may vary depending on your tools, technique, and luck.
Please read with caution, think critically, and take full responsibility for any actions you choose to take.
The author is not a professional technician—just a curious DIYer who values safety, learning, and a bit of fun.